Tips to Give Your Mix the NUGEN Stereoizer Treatment
In the world of music production, creating a professional, immersive mix isn’t just about balancing levels or EQ’ing instruments. One of the most overlooked yet powerful aspects of mixing is stereo imaging—the way sounds are placed across the left-to-right spectrum. A wide, spacious mix can elevate even a simple track, giving it depth, clarity, and emotional impact.
This is where NUGEN Stereoizer comes in. Unlike many stereo widening plugins that often introduce phase issues, hollow tones, or loss of clarity in mono playback, Stereoizer is specifically designed to deliver natural-sounding width without compromising the mix. It’s trusted by producers, engineers, and post-production specialists worldwide for its transparency, accuracy, and flexibility.
If you’ve ever wondered how to take your mixes from flat to wide and immersive without falling into the traps of over-processing, this guide will walk you through detailed tips to give your mix the NUGEN Stereoizer treatment.
Understanding Stereo Width Before Using NUGEN Stereoizer
Before diving into tips, it’s essential to understand what stereo width is and why it matters:
- Mono sound: Everything comes from a single source, with no width. It’s direct and focused but lacks immersion.
- Stereo sound: Audio is spread across two channels—left and right—creating space, direction, and depth.
- Stereo width in mixing: By controlling how instruments occupy space between the speakers, you can craft a mix that feels alive.
However, poorly managed stereo width can lead to problems: phase cancellation, weak mono translation, or an unbalanced mix. NUGEN Stereoizer was built to solve these problems by giving you width without the common drawbacks.
Why Choose NUGEN Stereoizer Over Other Widening Tools?
Many producers use widening tricks such as panning delays, chorus effects, or mid/side EQ. While effective, these methods can compromise clarity. Here’s why Stereoizer is different:
- Phase-Coherent Processing – Avoids the phase cancellation that plagues many widening plugins.
- Mono Compatibility – Ensures your mix still sounds powerful on mono systems.
- Precision Controls – Lets you apply width to specific frequency ranges and sound sources.
- Natural Sound – It doesn’t artificially stretch audio but enhances its natural stereo cues.
- Post-Production Standard – Widely used in film, TV, and music for professional-grade results.
By understanding these strengths, you’ll know how to apply Stereoizer strategically in your workflow.
Tips to Master the NUGEN Stereoizer Treatment
Start Subtle and Build Gradually
Stereo width can be addictive. Push it too far, and your mix may sound unnatural. The best practice is to start with small adjustments. Use Stereoizer to enhance the natural stereo field rather than force it. Remember, width should support the song, not dominate it.
Pro tip: Close your eyes and A/B test with the plugin bypassed. If the difference is noticeable but not distracting, you’ve struck the right balance.
Widen Select Frequency Ranges for Clarity
Not all parts of the frequency spectrum need widening. In fact, widening the wrong frequencies can cause your mix to lose punch. With Stereoizer’s frequency-based controls, you can:
- Keep sub-bass and low-end instruments centered for power.
- Gently widen midrange elements like guitars, keys, and backing vocals.
- Apply stronger width to high-end details like cymbals, synth sparkles, or effects for brightness and space.
This ensures your mix feels big yet grounded.
Preserve Mono Compatibility
A professional mix must sound good everywhere: on club speakers, headphones, laptops, and even mono devices like smartphones. Stereoizer’s algorithms are phase-coherent, but you should still check your mix in mono regularly.
Workflow tip: After applying Stereoizer, hit the mono button on your DAW. If the mix collapses or loses critical elements, dial back the width until it feels consistent across both stereo and mono.
Apply Width Selectively Across Instruments
Don’t make the mistake of widening everything. Stereo width works best when there’s contrast:
- Lead vocals: Keep centered for focus and intimacy.
- Backing vocals: Widen for lush, atmospheric support.
- Guitars/keys: Add stereo width to create fullness around the lead elements.
- Drum overheads: Widen for a natural room feel, but keep kick and snare central.
- Effects (reverbs, delays, FX hits): Stereoizer can make these elements surround the listener for cinematic impact.
By choosing which instruments to widen, you create a balanced, three-dimensional soundstage.
Automate Stereo Width for Dynamic Impact
Static widening can make a track feel predictable. With automation, you can enhance emotional impact:
- Keep verses tight and intimate by reducing width.
- Expand the stereo field in choruses or drops for maximum energy.
- Use width changes in breakdowns to surprise the listener.
Stereoizer’s clean processing makes it perfect for automation without introducing artifacts.
Combine Stereoizer with Panning Techniques
Stereoizer is not a replacement for panning—it’s a complement. First, establish a natural stereo image with panning. Then, apply Stereoizer to refine width and add depth.
Example: Pan two guitars hard left and right, then use Stereoizer to slightly widen the higher frequencies. This adds shimmer and air without unbalancing the mix.
Use Different Modes for Different Goals
Stereoizer offers multiple widening algorithms (Interaural Intensity Difference, Interaural Time Difference, and Interaural Phase Difference). Each affects how width is perceived:
- Intensity Difference: Subtle, natural widening. Great for vocals.
- Time Difference: Adds depth and spaciousness. Perfect for instruments and pads.
- Phase Difference: Creates dramatic width. Use carefully for special effects.
Experiment with these modes to find the best fit for your track.
Enhance Effects and Ambience
Stereoizer works wonders on ambient sounds. For example:
- Make reverbs bloom across the stereo field.
- Push delay tails wider to fill empty space.
- Enlarge sound effects in film or game audio for immersion.
This turns simple elements into cinematic textures that elevate the entire mix.
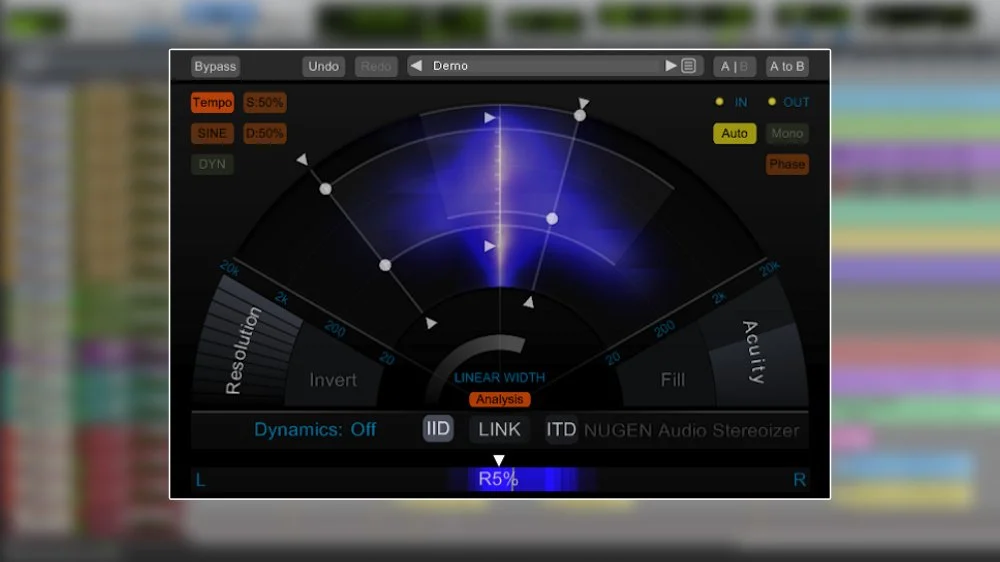
Trust Your Ears More Than Visuals
Stereoizer comes with excellent visual feedback, but don’t mix with your eyes. Every track, genre, and playback system is different. Always rely on your ears to judge whether the width is helping or hurting the track.
Test on Multiple Playback Systems
Finally, once you’ve applied the NUGEN Stereoizer treatment, listen to your mix on:
- Studio monitors
- Headphones
- Car speakers
- Bluetooth speakers
- A smartphone in mono
This step ensures your mix translates universally, a hallmark of professional mixing.
Advanced Applications of NUGEN Stereoizer
For EDM & Pop
Producers often want massive drops and wide choruses. Stereoizer can widen synth stacks, pads, and backing vocals to create festival-ready energy.
For Rock & Metal
Guitar layers benefit hugely from Stereoizer. Instead of muddying the mix, it helps each layer find its own space, especially when combined with panning.
For Film & TV
Stereoizer is invaluable in post-production, where sound designers use it to place effects or dialogue in immersive environments without breaking mono compatibility.
Common Mistakes to Avoid
- Over-widening low-end frequencies → Leads to weak, muddy bass.
- Applying width to every element → Results in a cluttered, unfocused mix.
- Ignoring mono compatibility → Your mix could collapse on mono playback.
- Forgetting automation → Static width can make your track feel lifeless.
Final Thoughts
The NUGEN Stereoizer treatment is not about making everything as wide as possible—it’s about enhancing the stereo field with precision, clarity, and musicality. By applying it selectively, respecting frequency ranges, and combining it with traditional panning, you can achieve mixes that are wide, immersive, and professional-sounding.
Remember: the best stereo image is one that supports the song’s emotion and energy. With Stereoizer, you have a tool that gives you both creative freedom and technical reliability.
If you want your music to stand out on streaming platforms, radio, or in live environments, mastering stereo width with NUGEN Stereoizer is one of the most effective ways to achieve that next-level sound.